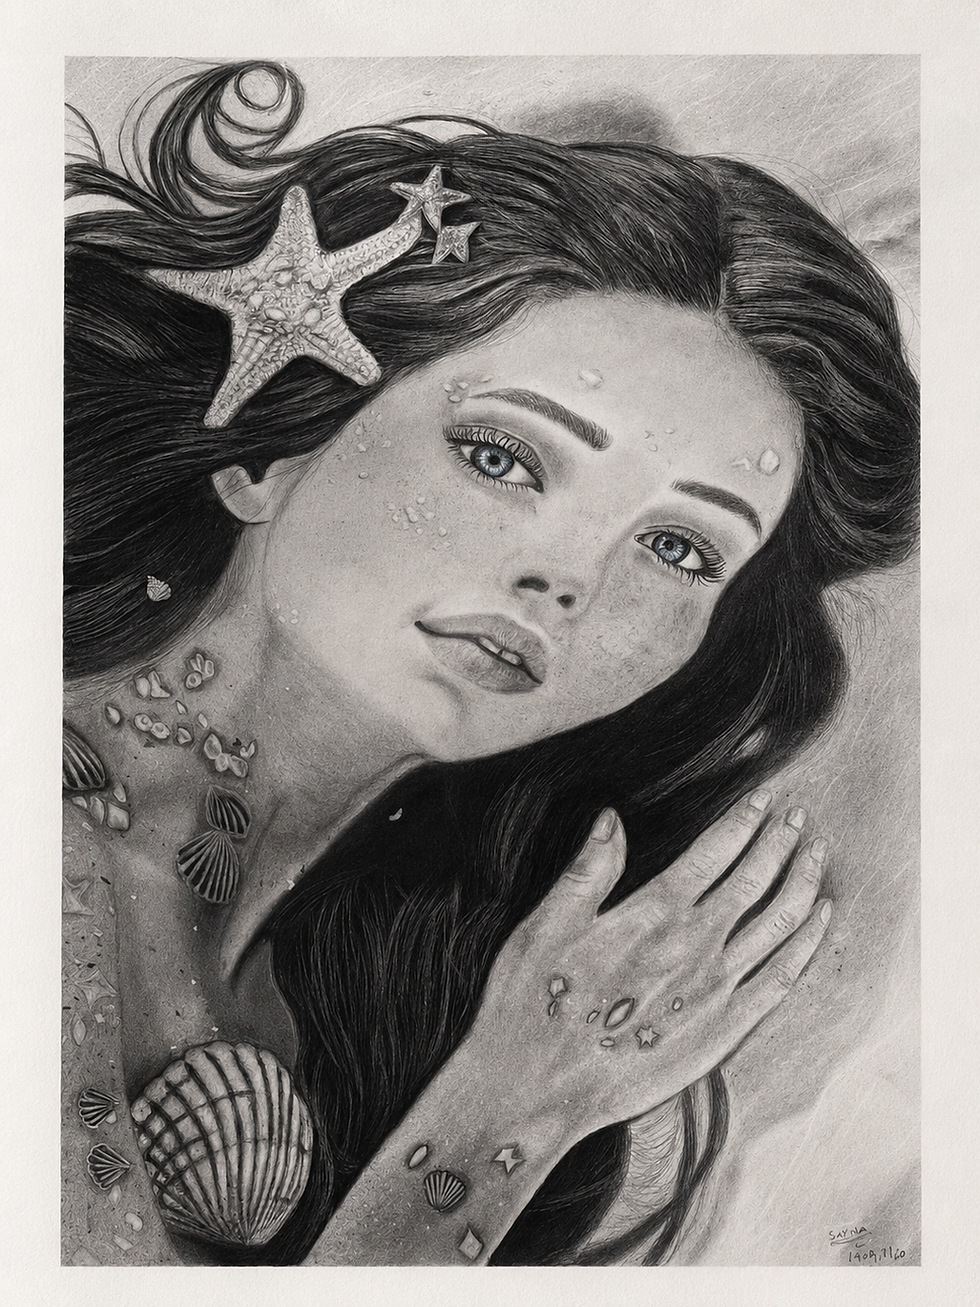
Siren’s Rest
Siren's Rest was my fifth professional artwork. Although it is primarily a black-and-white drawing, it was the first time I introduced color into one of my realistic portraits. Instead of keeping the entire artwork monochrome, I chose to color only the eyes to create a striking focal point.
For this piece, I used two Faber-Castell Polychromos colored pencils—Phthalo Blue (110) and Cobalt Green (156). By carefully layering and blending these two colors, I created realistic blue-green eyes that stand out beautifully against the monochrome portrait.
This artwork also presented an unexpected challenge. Unfortunately, the Fabriano paper I purchased did not have the smooth surface that I usually prefer for realistic portrait drawings. As I mentioned in my tutorials, smooth paper is very important for creating soft, realistic skin. Thankfully, because this portrait contains freckles, seashells, and textured elements, I was able to adapt my techniques and achieve a natural result despite the paper's rougher surface.
This artwork marked a new chapter in my artistic journey by introducing color into my black-and-white realism.
Completion Time: 92 hours
Year: 2026
ARTWORK DETAILS
-
Title: Siren's Rest
-
Completion Time: 92
-
Size: A3
-
Paper: Fabriano
-
Medium: Graphite Powder, Charcoal Powder, Conte Pencil, White Conte, Polychromos Colored Pencils
-
Skill Level: Advanced Realism
MY PROCESS – STEP BY STEP
1. Grid Drawing
I first created the drawing using the grid technique to ensure accurate proportions.
After completing the grid drawing, I transferred it onto Fabriano paper.
Before beginning the shading process, I applied masking tape around the edges of the paper to secure it to the drawing board and create a clean white border around the finished artwork.
2. Coloring the Eyes
As with all of my portraits, I always begin by drawing the eyes because they are the most expressive part of the face.
For the first time, I introduced color into one of my artworks using Faber-Castell Polychromos colored pencils.
I used:
Phthalo Blue (110)
Cobalt Green (156)
By gradually layering these two colors, I achieved realistic blue-green eyes while maintaining the overall monochrome style of the portrait.
3. Eyebrows and Eyelashes
The eyebrows and eyelashes were drawn using a Lumograph graphite pencil sharpened with both a cutter and a sharpener to create extremely fine lines.
I then softened them slightly using a Size 2 soft brush, creating a more natural appearance without losing the sharp details.
4. Creating the Skin
The skin was created using a combination of graphite powder and charcoal powder.
To prepare the graphite, I shaved graphite sticks using a cutter and sandpaper until they became a fine powder.
The graphite powder was used for the lighter skin tones, while charcoal powder was applied only in the darker shadow areas.
Before applying either powder to the artwork, I first blended it onto a separate sheet of paper to remove excess pigment. Then, using soft brushes, I blended the powders onto the portrait with gentle circular movements, gradually working from the darker areas toward the lighter ones to create smooth, realistic skin.
5.Creating the Freckles
The freckles were created using a blending stump dipped lightly into charcoal powder.
After placing the freckles individually, I softened them gently with a Size 2 soft brush to help them blend naturally into the skin rather than appearing as harsh dots.
6. Seashells
The white seashells resting on the skin required several different techniques.
I first drew their outlines using a Size 0 stiff brush and charcoal powder to establish their shapes and shadows.
Afterward, I applied White Conte to create the bright surfaces of the shells, allowing them to stand out naturally against the skin.
The small starfish in the hair were also colored using White Conte.
7. Hair
The hair was first developed using Conte powder applied with soft brushes to establish the overall dark values.
I then drew individual strands using a Conte pencil before blending them gently with soft brushes.
Finally, I used a small mechanical eraser, sharpened to a fine point, to lift highlights and create realistic light-colored hairs.
8. Skin Highlights
The soft highlights across the face were created using a combination of kneaded eraser and brush eraser.
These tools allowed me to gradually lift graphite and charcoal from the paper, creating soft transitions and natural-looking highlights.
I also used a soft brush with charcoal powder to gently shade beneath the chin, increasing the depth and giving the face a stronger three-dimensional appearance.
9. Lips
The natural lines and texture of the lips were created using charcoal powder applied with a blending stump.
I then used a brush eraser to lift the brighter lines and highlights, creating realistic lip texture and softness.
10. Hands and Fingers
In my opinion, the most challenging part of this artwork was drawing the hand and fingers.
Hands require accurate proportions, subtle shading, and careful attention to anatomy.
I created the darker lines using charcoal powder with a Size 0 stiff brush.
The lighter areas and highlights were then lifted using a brush eraser, helping define the fingers while maintaining smooth transitions.
11. Background
The background was created using a very light layer of charcoal powder.
After blending it smoothly with soft brushes, I used a brush eraser to gently remove charcoal and create fine linear textures that resemble sand.
This subtle background helps keep the focus on the portrait while reinforcing the beach-inspired atmosphere.
12. Final Check
Before completing the artwork, I carefully compared every section with the original reference, making sure the proportions, textures, values, and details were accurate.
13. Removing the Tape
After the artwork was finished, I carefully removed the masking tape by peeling it back slowly at a low angle to avoid damaging the paper.
This revealed a clean white border around the completed drawing.
14. Applying Fixative Spray
Finally, I applied several light coats of fixative spray to protect the graphite, charcoal, Conte, and colored pencil from smudging and to preserve the finished artwork.
Always spray the fixative in a well-ventilated area, holding the can approximately 30–40 cm away from the paper and applying several light coats rather than one heavy coat.
Drawing Tools & Materials
-
Fabriano Paper
-
Graphite Sticks (Powdered)
-
Graphite Powder
-
Charcoal Powder
-
Conte Pencil
-
Conte Powder
-
White Conte
-
Lumograph Graphite Pencil
-
Faber-Castell Polychromos Colored Pencils
-
Phthalo Blue (110)
-
Cobalt Green (156)
-
Soft Brushes (Sizes 0, 2 & 4)
-
Stiff Brush (Size 0)
-
Blending Stumps
-
Small Mechanical Eraser
-
Brush Eraser
-
Kneaded Eraser
-
Cutter
-
Sandpaper
-
Masking Tape
-
Fixative Spray
TECHNIQUES I USED
-
Grid Technique
-
Selective Color Technique
-
Smooth Skin Blending
-
Circular Brush Blending
-
Layered Hair Technique
-
Freckle Technique Using Blending Stumps
-
White Conte Highlights
-
Realistic Hand Rendering
-
Sand Texture Using Brush Eraser
-
Clean Border Using Masking Tape
-
Protecting the Artwork with Fixative Spray


FINAL THOUGHTS
Siren's Rest allowed me to experiment with combining monochrome realism and selective color for the first time. The vibrant eyes became the focal point of the portrait while the rest of the composition remained in black and white. Although the paper quality presented an unexpected challenge, adapting my techniques helped me achieve the smooth skin, delicate textures, and soft atmosphere I had envisioned. This artwork strengthened my portrait skills and encouraged me to explore new artistic ideas while remaining faithful to my realistic drawing style.
Home
Services
Gallery
About
Contact
LOCATION
Iran - Tehran
SOCIAL
Instagram
STAY CONNECTED
Get the latest news & updates
© 2026 by Bahareh Ahrabi
Proudly designed by Bahareh Ahrabi